Total Pageviews

Display your Location on Facebook to a Select Few

Facebook has unveiled a new location based service called Facebook Places to help you easily broadcast your current location to your friends on Facebook.
For instance, if you are inside a shopping mall, you can tell your friends where you are through Facebook Places and the service will also show you other people who may be near that place around the same time. Watch the following video to learn more:

What is Facebook Places


Who’s gets to see your location on Facebook

Privacy will obviously be a concern and, fortunately, this time Facebook has added extremely simple settings to let you control the visibility of places where you are checking-in.
You may go to Facebook Privacy –> Customize Settings and change the option under “Places I check in” to friends, friends of friends or set it to everyone in case you would like broadcast your current geographic location to the whole world.
Hide Location from all
If you would like to hide your geo-location from everyone, either don’t check-in with Facebook Places at all or simple go back to “Places I check in” and set it to Custom –> Only Me.
hide facebook location
Show Location to Selected Contacts
Finally, if you are connected with a large number of people on Facebook and would like to share your location only with close friends and family members, you can do that as well.
Go to your Facebook Friends page and create one or more lists of people with whom you want to share your current location. Then go back to your Facebook privacy page, choose Custom –> Make this visible to and type the names of your new friends list.
facebook location privacy
You may use Facebook Places using the mobile browser of any cell phone that supports HTML5 and geolocation. The service however is currently available only in the U.S. and everyone else may have to wait a bit.

How to Capture Videos of Google Earth


This is a short video animation captured using the free version of Google Earth.
The video in high-resolution (720p HD) and the animation plays very smoothly but before I share the actual software that I used to record this movie clip, please read the guidelines for using content from Google Earth and Google Maps:
[Offline use] If your proposed offline use of Google Maps or Google Earth is limited in scope, the concept of ‘fair use’ may apply
[Online use] You do not need permission to create and display video created from Google Maps or Google Earth in a video, whether hosted on your own site or through a service such as YouTube. You must purchase a copy of Google Earth Pro if exporting motion video, because screen capturing is not allowed.
If your usage meets the ‘fair use’ criteria, you can use the free Wegame client to record movies of Google Earth on your Windows machine. Wegame, a popular tool for recording video games, was recently updated and it now supports full-screen recording at 30 frames-per-second for smooth video.
Unlike most other screencasting software where you just hit the Record hotkey to start recording, it may take a couple of tries for you to get comfortable with the Wegame capture process.
Recording Google Earth
Launch the Wegame client and connect with your online account – you don’t have to upload your movies online but you still need to login for the software to work.
Then launch Google Earth and you’ll see a green square box inside the Earth program. Hit F6 and the square should disappear meaning the animations are getting recorded. Hit F6 to stop the capture and the recorded video will get saved in your My Documents folder.
If you are recording Google Earth animations on a slow machine, try lowering the frame rate to 15 or 20 and also switch to Half-screen recording. The video is saved in Windows Media format that you can play in almost every media player.

Tutorial: Create a Stop-Motion Animation Movie using Digital Camera or WebCam

<a href="http://www.youtube.com/watch?v=nnjdocFfi7M">Watch the Stop Motion Animation Video on Youtube (19 seconds)</a>

Sometime back, I created a stop-motion animation film with the soft toys of my 2-year old son playing the lead roles. This 19 second movie was done using just a digital still camera (not video camcorder) and Windows Movie Maker, a free video editing software.

If the term "Stop Motion" is new for you, Wikipedia defines it as an animation technique which makes static objects appear to move. The object is moved by very small amounts between individual frames, producing the effect of motion when the film is played back.

To create a stop motion animation, you need a webcam or a basic digital camera (preferably mounted on a tripod for stability) and any video editing software (like Windows Movie Maker, Adobe Premiere Pro, Apple iMovie, etc)

Step 1: Fix your camera in front of the subjects (Mickey Mouse & Co. in my case). You can also your webcam mounted on the computer screen and capture still photographs using the keyboard.

Step 2: Visualize the movements and action of the characters in the movie (like what path they would follow, whether they would jump, etc). You may want to write this down as a rough movie script.

Step 3: Once your initial setting is in place, click the first picture. Now move the object(s) by a very small distance (few centimeters) and shoot the next picture. Make sure you don't change the position of your camera.

Repeat the step until all your characters reach the final frame.

Here's are some sample photographs shot for the movie embedded above - Notice how the elephant, dog and Mickey have moved in each of the frames while the bear is sitting still.


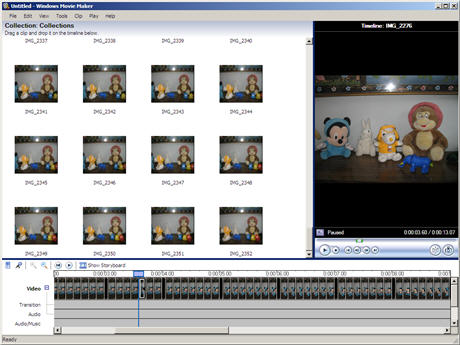
Step 4: Open Windows Movie Maker and goto Tools, Options and click the Advanced tab. Change the "Picture Duration" to 0.125 seconds and Transition Duration to 0.25 seconds (both are minimum values).

Now import all your digital photographs into Movie Maker and drag-n-drop them onto the Video Timeline. That's it. Export the video in AVI or WMV format and upload it to YouTube for sharing with your friends.

Bonus Tip: If you like your characters to jump in the stop-motion animation video, attach them to a thin wire and lift the wire a few centimeters in each frame. If the wire is of the same color as the background, it won't be visible in the final movie.

If you have professional video editing software like Adobe Premiere Pro or Apple Final Cut Pro, you can further reduce the time duration between still photographs to create smooth animation video without flickers or jerks.

Steve's Tutes - animation and video tutorials

What is your advice to a graduating student as they begin their career as an animator?

What is your advice to a graduating student as they begin their career as an animator?


One bit of advice I would give an animator starting out is the same advice that one of my mentors, Gleen McQueen (from Pixar), gave me.

(Paraphrasing) “Get out there and get work… anywhere. Get your foot in the door any way you can – it’s much easier to work your way to where you want to be from within the studio than from the outside. Don’t be overly particular about where you are working when you’re first starting. Any experience is good experience.”

There is pretty much nothing in life that you can’t study and put your observations and experiences to good use in animation. It’s really quite a renaissance art; you need to be constantly observing life in general to create great stories and characters, and you never know when you’ll find an amazing story in any experience. So even if you can’t get work as an animator initially, use whatever you DO end up doing in the meantime to build up your arsenal of skills! If you’re working at a physical job, like landscaping or something like that, just imagine all of the great observations you’ll be able to make about body mechanics, lifting heavy objects, and even just paying attention to what your own body is doing as you are working. If you are working in an office, pay attention to the different personalities and dynamics at play. Watch people interact with each other, pay attention to nuances of body language, the differences in the way individuals stand, walk, gesture. It’s a totally different way of “seeing.” And all of the experiences you have, whether in an animation studio or somewhere else, can be used to make you a better animator.

The other bit of advice I would give is PERSISTENCE. Just because you don’t get accepted to the first batch of studios you apply to does not mean you should give up and find something else to do. It means you keep working on your skills, adding new shots to your reel, getting rid of old work, and send those reels back out again! Studios will keep files on you, and watch your progress. And don’t think that they won’t notice your enthusiasm either.