Sher Shikari, a raging war between Humans and Tigers. A story of revenge of a Gallant Prince. This intriguing strategy game is based on the traditional Indian board game Aadu Puli Attam (Tiger-Goat game) and set in the period of The golden age of Ancient India. Play as a Human against the computer to fight the Tigers or play with your friend to test your strategy skills.
HURRAY!!!! SAP IDES ACCESS HAS BEEN GRANTED IN OUR SITE... THOSE WHO LIKES TO PRACTISE IN SAP... REGISTER IN OUR SITE AND GRANT ACCESS TO ONLINE SAP IDES FOR FREE!!!!!!!
The auction of cricket players for IPL season 4 is held in Bangalore. Out of the initial 421 cricketers who had expressed an interest to participate in the auction, a short list of 350 cricketers was produced by the various IPL franchises. 72 players were auctioned on day one with the rest going under the hammer today, January 9.
Join us here for live updates of day two:
12.39 pm: Jaidev Unadkat sold to KKR for $250,000
12.34 pm: Australian Ben Hilfenhaus sold to Chennai for $100,000
12.29 pm: Scott Styris of NZ sold to Chennai for $200,000
12.21 pm: Venugopal Rao sold to Delhi for $700,000
12.14 pm: Australian Luke Pomersbach sold to RCB for $50,000
12.00 pm: Australian Steven O'Keffe sold to Kochi for $20,000
11.56 am: South African Van der Merwe sold to Delhi for $50,000
11.52 am: No takers for Monty Panesar, Rangna Harath
11.50 am: Lakshmipathy Balaji sold to KKR for $500,000
11.48 am: Clint McKay sold to Mumbai Indians for $110,000
11.45 am: Umesh Yadav sold to Delhi for $750,000
11.41 am: Australian Shaun Tait sold to Rajasthan Royals for $300,000
11.39 am: Munaf Patel sold to Mumbai Indians for $700,000
11.35 am: Ashok Dinda sold to Delhi for $375,000
11.33 am: Dan Christian sold to Deccan Chargers for $ 900,000
11.30 am: Vinay Kumar sold to Kochi for $ 475,000
11.28 am: South African Charl Langeveldt sold to Royal Challengers for $140,000
11.26 am: Dan Christian sold to Deccan Chargers for $ 900,000
11.23 am:Ajit Agarkar sold to Delhi for $ 210,000
11.21 am: Ravi Bopara, Dwayne Smith, Jacob Oram unsold
11.19 am: Thisara Parera of Sri Lanka sold to Kochi for $80,000
11.16 am: Australian Daniel Christian sold to Deccan Chargers for $900,000
11.09 am: Sanath Jayasuriya, Tim Bresnen, Michael Yardy, Luke Ronchi not sold
11.04 am: Matthew Wade of Australia sold to Delhi Daredevils for $100,000
10.57 am: IPL-4 players' day 2 auction begins
10.42 am: After the first day of bidding, five of the franchises have retained a total of 12 players (seven Indians and five overseas players) in advance of the auction.
10.26 am: In the fourth edition of the T20 league, each team will play seven matches at home, and seven away.
10.18 am: On the opening day, dashing India opener Gautam Gambhir became the costliest cricketer in the IPL by fetching a whopping USD 2.4 million.
10.10 am: Franchises have a remaining cumulative salary cap of USD 19.5 million to be used both in the auction room and to sign uncapped Indian players after the day's proceedings.
10.00 am: 18 Indian, 53 overseas players up for sale today
DAY 1
6.10 pm: 72 players are sold on Day 1 of the auction
6.05 pm: England batsman Paul Collingwood sold to Rajasthan Royals for $250,000 (Rs 1.15 crores)
6.03 pm: S Badrinath retained by CSK for $800,000 (Rs 3.68 crores)
5.59 pm: C Pujara grabbed by Royal Challengers Bangalore for $700,000 (Rs 3.2 crore)
5.53 pm: Manoj Tiwary bought by KKR for $475,000 (Rs 2.2 crore)
5.48 pm: Aussie Callum Ferguson goes to Pune for $300,000(Rs 1.4 crore)
5.47 pm: Bangladesh cricketer Tamim Iqbal unsold
5.45 pm: Aussie batsman Brad Hodge picked up by Kochi for $425,000 (Rs 2.0 crore)
5.42 pm: England batsman Eoin Morgan goes to KKR for $350,000 (Rs 1.6 crore)
5.37 pm: Unheralded Aaron Finch goes to Delhi Daredevils for $300,000 (Rs 1.4 crore)
5.33 pm: Off-spinner Ramesh Powar goes to Kochi for $180,000 (Rs 82.8 lac)
5.30 pm: Nathan McCullum sold at base price of $100,000 to Pune (Rs 46 lac)
5.28 pm: Leggie Amit Mishra sold to Deccan Chargers for $300,000 (Rs 1.4 crore)
5.24 pm: Murali Kartik unsold
5.23 pm: Left-arm spinner Pragyan Ojha bought by Deccan Chargers for $500,000 (Rs 2.3 crore)
5.20 pm: No takers for Sri Lankan spinner Ajantha Mendis
5.18 pm: Off-spinner R Ashwin retained by Chennai Super Kings for $850,000 (Rs 3.9 crore)
5.16 pm: Leg-spinner Piyush Chawla grabbed by Punjab for $900,000 (Rs 4.1 crore)
5.12 pm: England spinner Graeme Swann goes unsold
5.06 pm: Muttiah Muralitharan sold to Kochi for $ 1.1 million (Rs 5.1 crore)
5.02 pm: Aussie speedster Doug Bollinger goes to Chennai for $700,000 (Rs 3.2 crore)
4.59 pm: Dirk Nannes goes to Royal Challengers Bangalore for $650,000 (Rs 3.0 crore)
4.57 pm: Aussie fast bowler Ryan Harris sold to Punjab for $325,000 (Rs 1.5 crore)
4.52 pm: Dale Steyn snapped up by Deccan Chargers for $1.2 million (Rs 5.5 crore)
4.49 pm: South African speedster Morne Morkel bought by Delhi Daredevils for $475,000 (Rs 2.2 crore)
4.45 pm: Brett Lee sold to KKR for $400,000(Rs 1.84 crore)
4.42 pm:Ashish Nehra bought by Pune for $ 850,000(Rs 3.9 crore)
4.39 pm:Praveen Kumar snapped up by Kings XI Punjab for $800,000 (Rs 3.7 crore)
4.36 pm: Ishant Sharma sold to Deccan Chargers for $450,000 (Rs 2.1 crore)
4.33 pm: England pacer James Anderson unsold
4.32 pm: Third session begins
Players auctioned so far:
Player
Country
Bought by Franchise
Price (in USD)
Gautam Gambhir
India
Kolkata Knight Riders
$2.4 million (Rs 11.04 crore)
Tilakratne Dilshan
Sri Lanka
Royal Challengers Bangalore
$650,000
Zaheer Khan
India
Royal Challengers Bangalore
$900,000 (Rs 4.14 crore)
Ross Taylor
New Zealand
Rajasthan Royals
$1m
Yusuf Pathan
India
Kolkata Knight Riders
$2.1million (Rs 9.66 crore)
Kevin Pietersen
England
Deccan Chargers
$650,000 (Rs. 2.99 cr)
Mahela Jayawardane
Sri Lanka
Kochi
$1.5 m (RS. 6.9 cr)
Yuvraj Singh
India
Pune Warriors
$1.8 m (Rs 8.28 cr)
AB De Villiers
South Africa
Royal Challengers Bangalore
$1.1 million (Rs 5.06 cr)
Cameron White
Australia
Deccan Chargers
$1.1 million (Rs 5.06 crore)
Jacques Kallis
South Africa
Kolkata Knight Riders
$1.1 million (Rs 5.06 crore)
Rohit Sharma
India
Mumbai Indians
$2 million (Rs 9.2 crore)
Andrew Symonds
Australia
Mumbai Indians
$850,000 (Rs 3.91 crore)
Kumar Sangakkara
Sri Lanka
Deccan Chargers
$700,000 (Rs 3.22 crore)
Adam Gilchrist
Australia
King's XI Punjab
$900,000 (Rs 4.14 crore)
Rahul Dravid
India
Rajasthan Royals
$500,000 (Rs 2.3 crore)
Graeme Smith
South Africa
Pune Warriors
$500,000 (Rs 2.3 crore)
Robin Uthappa
India
Pune Warriors
$2.1 million (Rs 9.66 crore)
Johan Botha
South Africa
Rajasthan Royals
$950,000 (Rs 4.37 crore)
VVS Laxman
India
Kochi
$400,000 (Rs. 1.84 crore)
Daniel Vettori
New Zealand
Royal Challengers Bangalore
$ 550,000 (Rs. 2.5 crore)
Brendon McCullum
New Zealand
Kochi
$ 450,000 (Rs 2.2 crore)
S Sreesanth
India
Kochi
$ 9,00,000 (Rs 4.1 crore)
Irfan Pathan
India
Delhi Daredevils
$1.9 million (Rs 8.74 crore)
R P Singh
India
Kochi
$500,000 (Rs 2.3 crore)
Michael Hussey
Australia
Chennai Super Kings
$425,000 (Rs 2.0 crore)
JP Duminy
South Africa
Deccan Chargers
$300,000 (Rs 1.4 crore)
Shikhar Dhawan
India
Deccan Chargers
$300,00 (Rs 1.4 crore)
Saurabh Tiwary
India
Royal Challengers Bangalore
$1.4 million (Rs 6.4 crore)
Wridhiman Saha
India
Chennai Super Kings
$100,000
Dinesh Karthik
India
King's XI Punjab
$900,000
Naman Ojha
India
Delhi Daredevils
$270,000
Brad Haddin
Australia
Kolkata Knight Riders
$325,000
Tim Paine
Australia
Pune Warriors
$270.000
James Hopes
Australia
Delhi Daredevils
$350,000
Davey Jacobs
South Africa
Mumbai Indians
$190,000
Ravindra Jadeja
India
Kochi
$950,000
Shakib Al Hasan
Bangladesh
Kolkata Knight Riders
$425,000(Rs 2.0 crore)
Stuart Broad
England
Kings XI Punjab
$400,000(Rs 1.8 crore)
Abhishek Nayar
India
Kings XI Punjab
$800,000 (Rs 3.7 crore)
Angelo Mathews
Sri Lanka
Pune Warriors
$950,000
Dwayne Bravo
West Indies
Chennai Super Kings
$200,000
Steven Smith
Australia
Kochi
$200,000
James Franklin
New Zealand
Mumbai Indians
$100,000
4.10 pm: IPL -4 auction: 2nd session ends
4.06 pm: James Franklin bought by Mumbai Indians for $100,000 (Rs 46 lac)
4.05 pm: Steven Smith snapped up by Kochi for $200,000 (Rs 92 lac)
4.03 pm: Dwayne Bravo goes to CSK for $200,000 (Rs 1.8 crore)
4.01 pm: Sri Lankan all-rounder Angelo Mathews snapped up by Pune for $950,000 (Rs 4.4 crore)
3.54 pm:Abhishek Nayar sold to Punjab for $800,000 (Rs 3.7 crore)
3.50 pm: Stuart Broad goes to Punjab for $400,000 (Rs 1.8 crore)
3.48 pm: Bangladesh all-rounder Shakib Al Hasan goes to KKR for $425,000 (Rs 2.0 crore)
3.46 pm: Luke Wright unsold
3.42 pm: Ravindra Jadeja sold to Kochi for $950,000 (Rs 4.4 crore)
3.39 pm: James Hopes bought by Delhi Daredevils for $350,000 (Rs 1.6 crore)
3.33 pm: David Jacobs sold to Mumbai Indians for $190,000 (Rs 87.4 lac)
3.26 pm: Matt Prior, Mark Boucher unsold
3.26 pm: Tim Paine snapped up by Sahara Pune Warriors for $270,000 (Rs 1.2 crore)
3.21 pm: Brad Haddin goes to Kolkata Knight Riders for $325,000 (Rs 1.4 crore)
3.20 pm: Naman Ojha goes to Delhi for $270,000 (Rs 1.24 crore)
3.14 pm: Dinesh Karthik signed up by King's XI Punjab for $900,000 (Rs 4.1 crore)
3.10 pm: Wridhiman Saha goes to Chennai Super Kings for $100,000
3.05 pm: Parthiv Patel goes to Kochi for $290,000 (Rs 1.3 crore)
3.03 pm: Brian Lara, Graham Manou unsold
3.01 pm: D Warner sold to Delhi for $7,50,000 (Rs 3.5 crore)
2.57 pm: David Hussey goes to Punjab Kings XI for $1.5 million (Rs 6.4 crore)
2.53 pm: Royal Challengers Bangalore sign Saurabh Tiwary for $1.6million (Rs 7.6 crore)
2.48 pm: Confusion over Saurabh Tiwary's bidding
2.42 pm: Shikhar Dhawan sold for $300,00 to Deccan Chargers (Rs 1.4 crore)
2.38 pm: Duminy goes to Deccan Chargers for $300,000 (Rs 1.4 crore)
2.36 pm: Chennai getsMichael Hussey for $425000 (Rs 2.0 crore)
2.35 pm: Bidding starts for Michael Hussey
2.32 pm: No takers for Jesse Ryder, Gibbs
Players auctioned so far:
Round 1
Player
Country
Bought by Franchise
Price (in USD)
Gautam Gambhir
India
Kolkata Knight Riders
$2.4 million (Rs 11.04 crore)
Tilakratne Dilshan
Sri Lanka
Royal Challengers Bangalore
$650,000
Zaheer Khan
India
Royal Challengers Bangalore
$900,000 (Rs 4.14 crore)
Ross Taylor
New Zealand
Rajasthan Royals
$1m
Yusuf Pathan
India
Kolkata Knight Riders
$2.1million (Rs 9.66 crore)
Kevin Pietersen
England
Deccan Chargers
$650,000 (Rs. 2.99 cr)
Mahela Jayawardane
Sri Lanka
Kochi
$1.5 m (RS. 6.9 cr)
Yuvraj Singh
India
Pune Warriors
$1.8 m (Rs 8.28 cr)
AB De Villiers
South Africa
Royal Challengers Bangalore
$1.1 million (Rs 5.06 cr)
Cameron White
Australia
Deccan Chargers
$1.1 million (Rs 5.06 crore)
Jacques Kallis
South Africa
Kolkata Knight Riders
$1.1 million (Rs 5.06 crore)
Rohit Sharma
India
Mumbai Indians
$2 million (Rs 9.2 crore)
Andrew Symonds
Australia
Mumbai Indians
$850,000 (Rs 3.91 crore)
Kumar Sangakkara
Sri Lanka
Deccan Chargers
$700,000 (Rs 3.22 crore)
Adam Gilchrist
Australia
King's XI Punjab
$900,000 (Rs 4.14 crore)
Rahul Dravid
India
Rajasthan Royals
$500,000 (Rs 2.3 crore)
Graeme Smith
South Africa
Pune Warriors
$500,000 (Rs 2.3 crore)
Robin Uthappa
India
Pune Warriors
$2.1 million (Rs 9.66 crore)
Johan Botha
South Africa
Rajasthan Royals
$950,000 (Rs 4.37 crore)
VVS Laxman
India
Kochi
$3,00,000 (Rs. 1.84 crore)
Daniel Vettori
New Zealand
Royal Challengers Bangalore
$ 500,000 (Rs. 2.5 crore)
Brendon McCullum
New Zealand
Kochi
$ 450,000 (Rs 2.2 crore)
S Sreesanth
India
Kochi
$ 9,00,000 (Rs 4.1 crore)
Irfan Pathan
India
Delhi Daredevils
$1.9 million (Rs 8.74 crore)
R P Singh
India
Kochi
$500,000 (Rs 2.3 crore)
1.22 pm:R P Singh goes to Kochi for $500,000 (Rs 2.3 crore)
1.17 pm: Delhi Daredevils sign up Irfan Pathan for $1.9 million
1.11 pm: No takers for Chris Gayle
1.09 pm: S Sreesanth sold to Kochi for $ 9,00,000 (Rs 4.1 crore)
1.05 pm: Brendon McCullum goes to Kochi for $ 450,000 (Rs 2.2 crore)
1.02 pm: Vettori sold to Royal Challengers Bangalore for $ 550,000 (Rs. 2.5 crore)
12.59 pm: VVS Laxman goes to Kochi for $4,00,000 (Rs. 1.84 crore)
12.56 pm: Johan Botha goes to Rajasthan Royals for $950,000 (Rs 4.37 crore)
12.49 pm: Sahara Pune Warriors buy Robin Uthappa for $2.1 million (Rs 9.66 crore)
12.42 pm: Graeme Smith sold to Pune Warriors for $500,000 (Rs 2.3 crore)
12.38 pm:Rahul Dravid goes to Rajasthan Royals for $500,000 (Rs 2.3 crore)
12.34 pm: Adam Gilchrist snapped up by King's XI Punjab for $900,000 (Rs 4.14 crore)
11.30 am: Taylor sold to Rajasthan Royals for $1 million
11.28 am: New Zealand cricketer Ross Taylor up for grabs
11.25 am: Zaheer Khan sold to Royal Challengers Bangalore for $900,000
11.24 am: Bangalore buy Tillakaratne Dilshan for Rs 2.9 crore
11.20 am:Gautam Gambhir goes to Kolkata Knight Riders for $2.4 million (Rs 11.04 crore)
11.19 am: Intense bidding war for Gambhir
11.11 am: IPL-4 players' auction begins
10.58 am: Team-wise wish list: Chennai Super Kings: Rohit Sharma, Yusuf Pathan, Saurabh Tiwary, Angelo Mathews
Delhi Daredevils: Rohit Sharma, Yusuf Pathan, Saurabh Tiwary, Shakib Al Hasan, Parthiv Patel
Deccan Chargers: Adam Gilchrist, Andrew Symonds, Brad Haddin, Dale Steyn, Kumar Sangakkara, Yuvraj Singh
Mumbai Indians: Praveen Kumar, Ashish Nehra, Chris Gayle, Rohit Sharma, Yusuf Pathan, Saurabh Tiwary
Royal Challengers Bangalore: Dale Steyn, Yusuf Pathan, Gautam Gambhir, Rohit Sharma, Saurabh Tiwary
Kolkata Knight Riders: Angelo Mathews, Manoj Tiwary, Ashoke Dinda, Brendon McCullum, Chris Gayle, Wriddhiman Saha
Rajasthan Royals: Jacques Kallis, Rohit Sharma, Yusuf Pathan, Saurabh Tiwary
Kings XI Punjab: Gautam Gambhir, Parthiv Patel, Irfan Pathan
Sahara Pune Warriors: Gautam Gambhir, Sourav Ganguly, Yuvraj Singh
Kochi: Gautam Gambhir, S Sreesanth, Robin Uthappa, Abhishek Nayar
10.52 am: According to sources, most of the IPL teams want all-rounder Yusuf Pathan and will hence bid for him at the auction.
10.48 am: Former Australian cricketer Bevan to coach Kings XI in IPL 4
10.40 am: Sourav Ganguly likely to be offered new role with KKR: Sources
10.31 am: BCCI sets new rules for signing of the uncapped players
10.23 am: IPL - 4 will start on April 8 in Chennai
10.16 am: Five franchises - Kings XI Punjab, Knight Riders, Deccan Chargers, Sahara Pune Warriors and Kochi IPL - head into the auction with the full purse of $9m.
10.09 am:Oldest Players Up for auctions: Australia: Adam Gilchrist (39 years 2 months) Bangladesh: Abdur Razzaq (38 years 6 months) England: Anthony McGrath (35 years 3 months) India: Sourav Ganguly (38 years 6 months) New Zealand: Scott Styris (35 years 6 months) South Africa: Herschelle Gibbs (36 years 11 months) Sri Lanka: Sanath Jayasuriya (41 years 6 months) West Indies: Brian Lara (41 years and 8 months).
10.02 am: At 41 years and 8 months, Brian Lara will be the oldest player at the IPL auctions.
9.55 am: The players retained:Mumbai Indians: Sachin Tendulkar, Harbhajan Singh, Kieron Pollard and Lasith Malinga; Chennai Super Kings: M.S. Dhoni, Suresh Raina, M. Vijay and Albie Morkel; Rajasthan Royals: Shane Warne, Shane Watson; Delhi Daredevils: Virender Sehwag; Royal Challengers Bangalore: Virat Kohli.
9.46 am: Only 12 players were retained by the IPL franchise for season 4.
9.42 am: Team owners have a cap of $9 million each to buy their fresh squads
9.35 am: Besides the earlier eight teams, new entrants - Kochi and Pune - will also bid for the cricketers who will come under the hammer
9.30 am: Following are the base prices of some of the star players who will go under the hammer in the Indian Premier League auction:
$4,00,000: Adam Gilchrist, Brett Lee, Shaun Marsh, James Anderson, Kevin Pietersen, Stuart Broad, Graeme Swann, Luke Wright, Michael Yardy, Rahul Dravid, Yuvraj Singh, Daniel Vettori, Brendon McCullum, Ross Taylor, Graeme Smith, AB de Villiers, Mahela Jayawardene, Tillakaratne Dilshan, Brian Lara, Chris Gayle, Sourav Ganguly.
$3,00,000: Zaheer Khan, Yusuf Pathan, Jacques Kallis, Muttiah Muralitharan, Andrew Symonds, Shaun Tait, Kumar Sangakkara, Angelo Mathews.
$2,00,000: Gautam Gambhir, Michael Hussey, Doug Bollinger, Dirk Nannes, Eoin Morgan, Robin Uthappa, Sanath Jayasuriya. $1,00,000:Tamim Iqbal, R. Ashwin, Morne Morkel, Ben Hilfenhaus.
9.22 am: This is the biggest auction in the tournament's history after the first auction on February 20, 2008, in Mumbai
9.00 am: Indian Premier League's player auction will be held at the ITC Royal Gardenia Hotel, Bangalore
Thanks For ur Full Hearted support in viewing our blog... In This occassion we Very happy to inform u that we are now nearing to the 1st year anniversary of Fearlessanimators team and Blog too.. So we are very happy in Presenting our NEW BRANDED LOGO for our Fearless animators Blog.... Dear Viewers , You are not Just a Viewer for our blog we are very proud to inform u that U all are also a part of our blog and our successes will be shared with you too.... And its proud to Inform U all That Fearless animators team will be involved in Working with SILVER SCREEN shortly... Discussions Is in Progress With some of the directors and producers...And we will be Producing and Directing some Short Films In Which It satisfies u all in LOVE, COMEDY, TECHINICAL as well as Script Oriented too... And our Blog is not just for animations, In Our 1st year anniversary on JAN 01 2011 we r very proud to launch an SAP IDES For Professional SAP consultant, Freshers in SAP can Practice SAP From their own desktops... The details Regarding SAP IDES Will be Posted shortly ..... Thanks For Ur SUPPORT...We Expect You all to support us forever. Thanks & Regards FearLessAnimators Team(U IMAGINE V CREATE)
Hunger Free Foundation in Association With Fearless animators have planned to provide one day meal for the orphans and the under previlaged people in the 1st week of october. we need all of ur support in doing this charity. Interested people contact us through ur comments.Donors can come forward and contribute your valuable service and offering. Last date for ur contributions is on 29.9.2010(wednesday). so hurry and make urself engaged for a social cause. Let us Unite and Work for a noble cause and make this world a better place to live in. 'EACH ONE FEED ONE-Lets make Hunger Free INDIA'.
Regards FearlessAnimatorsCrew(U imagine V Create).
In This Tutorial We Will Show You To Create The Spiderman Text Effect In The Adobe Photoshop.
Steps To Follow:
1. Open The Photoshop And Create A New Layer With Black Background Color.
2. Now Add The Spiderman Text By Using The Text Tool From The Tools Palette.
3. From The Blending Options Give An Inner Shadow To The Text.
4. Set The Blending Mode As Screen And Then Set The Shadow Angle To 90o And Set The Shadow Distance To 3 Points And Size 3 Points As Well.
5. Click On The Gradient Overlay Option In The Blending Options To Add A Gradient On The Text.
6. Set The Dark Gray Color For The Left Side Of The Gradient And Light Gray For The Right Side And Click Ok
7. Click On The Inverse Box In The Options.
8. Set The Gradient Style As Linear And Gradient Angle As 90o And Scale 100% And Click Ok
9. Create A New Layer And Drop It Down To Text Layer.
10. Click On The Text Layer To Select The Text In The Layer.
11. From Select Menu Select Modify>expand And Set It To 5 Pixels And Click Ok
12. Now Select The White Color Of The Foreground And Fill On The Text By Using The Paint Bucket Tool.
13. Now Select The Bevel And Emboss Option From The Blending Options And Set The Depth To 390 % And Gloss Contour As Ring And Click Ok
14. Now Click On The Outer Glow Option And Then Turn The Blending Mode To Multiply And Also Turn The Opacity To 100% And Size To 35 Pixels And Click Ok
15. Now Click On The Foreground Color And Then Type The Color Number 414042 And Click Ok
16. Now Take The Brush Tool And Turn The Master Diameter Of The Brush To 108 Pixels And Select The Brush Of Round 21 Soft And Start Painting On The Text And Then Deselect The Text.
17. Inactivate The Background Layer By Clicking On The Eye Icon On The Layers Palette And Then Open The Spiderman Title Image And Drag It On The Text Layer By Using The Move Tool From The Tools Palette And Place It Right Center Of The Text. That’s All.
Click on “Objects > Spline Primative > Text” to make a Text Spline at the origin. Click on “Objects > Primitives > Cube” to make a cube object at the origin.
Step 2
Give the Cube Object the parameters of : X= 400, Y=180, and Z=10. Set the ‘Position’ to: X=0, Y=70, and Z=10. Then set the ‘Segments’ to: X=5, Y=3, and Z=2. Click on “Objects > NURBS > Extrude NURBS object”. Apply the ‘Extrude Nurb’ object to the ‘Text Spline’, by parenting the ‘Text Spline’ to the ‘Extrude Nurb’.
Step 3
Give the ‘Extrude Nurb’ a ’2m’ bevel by clicking on “Caps” and changing the ‘Start’ and ‘End’ Caps to ‘Fillet Cap’ and the ‘Radius’ to ’2m’. Move it on the Z-Axis to a position of ‘-10′.
Step 4
Select both the ‘Extrude Nurb’ and the ‘Text Spline’ and click on the “Make Editable” option to turn them from nurbs into polys.
Step 5
Click on “Objects > Modeling > Connect Object” and parent the ‘Extrude Nurb’ to the ‘Connect Object’. Then click “Make Editable” to turn these separate polygons into one single polygon object.
Step 6
Delete the selection tags, and change the ‘Phong Angle’ in the “Phong” tag to ’35′ degrees. This hardens the edges in the bevels.
Step 7
Click on “Objects > Deformation > Explosion FX” twice. Parent the ‘Explosion FX’ deformer to the separate objects, and rename them ‘Box’ and ‘Text’
Step 8
Cinema 4D will get ahead of us on this (like it always does) and apply a stock explosion to both objects, using the polygon parameters we have given it to break up the object. First, change the Box’s explosion. Turn the display off of the Text by clicking on the topmost dot two twice to turn it red.
Step 9
Go into the ‘Explosion FX’ (under the Box), and change the parameters as follows. First, under “Object Properties”, change the Time to ’0%’.
Step 10
Now, change the “Explosion” properties to the following parameters. Turn the ‘Strength’ to ’1,050′ (greater than 1000 is important), the ‘Direction’ to ‘Except Y’, the ‘Blast Time’ to ’1,020′ (greater that 1000 is important again), the ‘Second Variation’ to ’57%’ (this will vary the blast speed), and finally, the ‘Blast Range’ to 600m.
XEROX CODE
Step 11
Under the “Cluster” properties, change the ‘Thickness’ to ’7′, and the ‘Cluster Type’ to ‘Polygons’. Now turn on ‘Disappear’, and set the ‘Kind’ to ‘Time’, the ‘Start’ to ’0′, and the ‘Duration’ to ’10′. This makes the pieces appear on the screen as they scale up from nothing and reach their final place on the object.
Step 12
Under “Gravity” change the ‘Acceleration’ to ’0′ and the ‘Range’ to ’670′.
Step 13
To animate this effect, keyframe the ‘Time’ under the “Object” settings of the ‘Explosion FX’ tag. Start at ’50%’ and animate it down to ’0%’. To animate it coming from a set direction, move the ‘Explosion FX’ tag to the opposite side that you want the polygons to fly from (if you want them to fly from left to right, move the tag to the right side of the object).
Step 14
For the text explosion, under the ‘Explosion FX’ tag, follow the same steps as above, only change the ‘Explosion’ settings as follows: ‘Blast Range’ to ’0m’, and ‘Blast Time’ and ‘Strength’ to exactly ’1000′. The “Cluster” settings should be the same, except the ‘Thickness’ should be ’10m’. Under the “Gravity” settings, change the ‘Range’ to ’400m’.
Step 15
To animate the Text ‘Explosion FX’, animate the ‘Time’ under “Object Properties” from ’50%’ to ’0%’. The polygons will appear to grow in place (instead of flying in), since the ‘Blast Range’ is now ’0m’.
Final Results
Note: Reflections make this thing pop, and give it depth. Try animating the actual ‘Explosion FX’ tag moving around the text letters. Combining the ‘Time’ animation with one of the ‘Special’ animation properties can yield some interesting results (especially ‘Twist’). A more advanced method would be to add an ‘Align to Spline’ tag to the ‘Explosion FX’, and draw a spline for the ‘Explosion FX’ to follow. Since the ‘Explosion FX’ object stays parented to the object that is being broken up, it will allow for some pretty sweet stuff!..DONE BY FEARLESS ANIMATORS.(YOU IMAGINE WE CREATE)...
visit us @ fearlessanimators.blogspot.com
A SQUARE ANIMATIONS INVITES U ALL TO THE ANIMATION FESTIVAL ON SEPTEMBER 10TH..
IF U ARE INTERESTED JUST SEND US A COMMENT OR SEND US A MAIL AT
(fearlessanimators@gmail.com)...WE WILL PROVIDE 40% DISCOUNT FOR U TO SHINE IN UR ANIMATION SKILLS...DONT MISS THIS OPPURTUNITY...PLEASE SUBSCRIBE ON OR BEFORE 3RD SEPTEMBER...
BY FEARLESS ANIMATORS CREW-FLAC(YOU IMAGINE WE CREATE)
Section 1 - Introduction
This tutorial is very advanced, and, unlike the Meteor tutorial, expects that you are already competent with the modelling and interface basics of Cinema 4D. Just in case you don't know what XPresso looks like, then you can check for the final result of our tutorial below:
Looks complicated, huh? Well, to be perfectly honest, is *IS* complicated, and takes some considerable time to master. Many people say that learning Xpresso is easy. Well, just to put the record straight I will repeat myself - It's NOT that easy! In fact, I sometimes think that using Xpresso is even more complicated than programming, although I cannot confirm this statement with absolute certainty, because the biggest program I ever made was a baskara equation and matrixes calculator. Whilst we are on the subject of programming experience, I am happy to report that you will not need any prior knowledge at all to start using Xpresso, although experience with logical process creation would be handy. Once you get past the basics, though, things get a lot easier, and if you have difficulties at the beginning you shouldn't worry - after all, its natural when starting in a new language, especially if you never programmed before.
So then, what are we going to create in this tutorial? Well, the idea is to make a little script to open a set double doors (just like those pesky automatic doors in shopping centers) when an object gets close to them, and then have them close automatically(fearlessanimators.blogspot.com) after it moves away. Just to summarize, here's a little movie clip to show you what I mean:
When something gets close to the door, it opens. When there's nothing near the door, it closes. Simple!
Note: The movie to the right is in a QuickTime format and should load automatically (plus install the relevant applet). If you can't see the movie, you may need to enable JAVA for your browser or lower its internal security settings.
The above clip is easily explained in the following terms:
There is an "area" around the door. When an object enters it, the right door will move constantly to the right, whilst the left door moves to the left. After these doors reach a certain point, they stop. After the object leaves the area, they will go back to their former position.
This explanation needs to be embellished with a little programming logic. How is this done? Well, after deciding the objective of the script, you will need to re-write your plan using clearer logic. Thus, the complete logical sequence in programming/xpresso terms is as follows:
There is an area (a box) around the door. If an object collides with this box, the right door will move constantly to the right, whilst the left door will move to the left. There is an object hidden in the scene, whose purpose is to block the door movement. If they are colliding, the door will stop moving. Also, if they are colliding, switch 1 will be set. For a switch I will use a hidden lighting spot brightness value. If Switch 1 is set and the there is no object inside the area, the doors will close. After the doors collide, switch 1 turns off.
Now it starts to get 'exciting'... and by 'exciting' I mean 'headache-inducing'. Because this is a tutorial and not a show-off, please keep in mind that I will introduce some logical pathways and connections in a way that could be done much simpler. The sole purpose of this method is not to confuse you, but to teach you some new nodes and different methods of logic. So then, what will you need before starting this tutorial?
A full knowledge of the Cinema 4D Interface.
Basic modelling skills.
And what will you learn?
Assigning an XPresso Function to an object.
Making Switches with XPresso.
Boolean functions.
Nodes you will learn:
- Object node.
- Collision.
- Math.
- Bool (Boolean).
- Absolute.
Sounds cool doesn't it? Well, lets get right onto the action then!
Section 2 - Setting up the Scene
For our scene we will need:
A Right Door
A Left Door
A Left Door Blocker
A Right Door Blocker
A Lighting Spot to be the Switcher
Some objects to open the door by floating near it
A huge box to be your door area.
This is how I laid out my scene. Arrange it the way you want, though. It's your scene!
If you just want a bland generic scene to complete the tutorial and learn Xpresso basics without all the needless fluff, arrange it like this:
If your doors are made up of different objects like mine, group them together to one object, preferably a Null. Assign ALL objects you will want to "open" the door to a Null object too, in case you want to use multiple objects.
The Door Blockers are not seen since they are inside the walls. The Area Box must be invisible. To do this, either create a material with no color, no specular and 100%(fearlessanimators.blogspot.com) transparency and assign it to the box, or simply disable the object from being seen in the final render. Either way works, though I prefer the first (so its optionally transparent in the view port too).
The Switch is a lighting spot, which can be problematic because it emits an unwanted light in your scene. To correct this, go into the attributes window of the Light object, find the General tab, and mark the "No Light Radiation" box.
We are done here. Moving on....
Section 3 - Making Doors Open When Something Comes Close
The first thing we will need to do is to create an XPresso function. You can assign it to any object, but let's assign it to the Area Box for now. Right click your Area Box in the Object Manager, select New Expression and click XPresso Expression. Double click it. It will open the XPresso window, which should look a little like this:
Your clean XPresso Window!
From this point onwards, I will work with a single door, and teach you how to clone the properties to the other one later. This will make things much simpler for us in the long term.
For our first step we will need to make the door open when something gets near it. Do to this, all we need to do is define logic so that when the object (called Sphere from now on to keep things simple) collides with the invisible area box, the right door moves to the right side.
To do this, drag-and-drop the Sphere and the Area Box to the XPresso window. It will show nodes of them. Right click in the window, and select New Node > XPresso > General > Collision. This is a node that, if a collision happens between the "Inputs", will give an output of "True". If no collision happens, the Output will be "false". Simple logic really.
We will need to connect these Object nodes to the Collision Inputs. So click on the red button (which I will call the Output button, and the blue button the Input button) in the upper-right of the sphere node. An array of inputs will now be made available to you and the node that you just clicked. Select "object", and do the same for the Area Box Node. An Object output should appear with a red spot. Click and hold the left button on that red spot and move it. A line will appear, allowing you to connect with an input. Drag the line to Input 1, and a connection will appear. Do the same for the other object but with Input 2. This sets up a simple logical configuration - i.e. when those two objects collide, the output of Collision node will be "1", or "True". If they are not colliding, it will be "0", or "False". Simple, huh?
PS: If your "colliding" object is in fact a group of many objects, check "Include Children" in the Node tab of the Collision's attributes in the attribute window.
Now the logic gets a little more complex. We need to make it so that when they collide, the door will move to the right. Sooo.... how do we calculate this move to the right? Well, in my scene, the path the door moves is in the X Axis (check yours separately). The door's movement, therefore, in programming terms, can be described as:
X Axis (final) = X Axis (start) + Value where value is the rate of the movement
or, more simply: X Axis = X Axis + y
We will need to make nodes that calculate this equation. Drag and drop the Right Door into the scene. We will need to get it's X Position, then add a value (y) to give the final output. Since we will be getting it's X Position, click in the Output button and select Coordinates > Position > Position.X (or whatever axis are you using). We now need to add the Y value to it. Right click in the XPresso window and choose New Node > XPresso > Calculate > Math. Ah-hah! We have a Math operator now! This is how it works - It will catch the value of the first input and add it to the second input. It's value will be then sent to the Output. You can leave the second input blank, as you can manually set it to a value. With this explained, click on the Math node and, in the attributes window's parameter tab, type a number in Input (2). The number you set here varies greatly with your preference and the scene scale, so I really can't help you. My advice is to start with a value of 1, and adjust it later if your doors open too slowly or quickly. In the Node Tab you can adjust the Function but, since we are merely adding adding values, leave it as add. Now connect the Position.X of the Right Door with the Math:Add Input 1.
We want the output of this little equation to be sent directly back to the Right Door's position X (thereby allowing additive movement along the X axis), so drag-and-drop another Right Door node, and connect as Position.X input. Connect the Math's output with it. Your XPresso screen should now look a little something like this:
To summarize what we have done so far: The X-axis position of the Right Door is retrieved (node 1), added to an arbitrary value of your choice (node 2), and then assigned back to the Right Door X-axis position, changing it permanently (node 3).
We have now to connect both series of nodes, so that the door will only move to the right if the sphere is colliding with the area box. Thankfully, there is an input called "On", which ensures that nodes are only enabled if they are receiving an input of 'true'. With this in mind, click on the Input box of the last Right-Door Node and create the 'ON' node, then connect it to the Collision Output. You should now have something like this:
Save the Scene, and try moving the sphere inside the Area Box. If you have done everything correctly, the right door should move to the right. If the door absolutely won't move at all, check it all again, as you must have done something very wrong. This is also the ideal time to check the movement speed of your door and tweak it a little before the coding gets too hefty.
Section 4 - Making Doors Stop When They Hit The Blocker Object
The Logic behind this step is actually in reverse - The doors won't "stop" when they hit the Blocker, they just move when they are NOT hitting the blocker. I know it sounds confusing, but you will understand it soon enough...
The first thing we need to do is create the collision between the right door and the blocker object. So, insert both objects' nodes and a collision node and connect them just like the first. You should get something like this:
Now things are starting to get serious - How are we going to make the door stop moving when it is colliding with the blocker? The answer is simple - we'll use Boolean functions! A Boolean function is one that plays with True and False values. We will configure the scene so that when the Area-Object Collision is True and Door-Blocker is False, the door moves, and if Area-Object is True and Door-Blocker True too, the door won't move. If Area-Object collision is false, independently of the Door-Blocker, the door won't move either.
Of course, we could just add a Dynamics module into the scene and be lazy, but what would be the fun of it? It is also unfortunate that this little cheat would make our scene MUCH slower to render!
Our boolean functions should IDEALLY look like this:
Area Box Collision
Blocker Collision
Movement
1 (TRUE)
1 (TRUE)
0 (FALSE)
1 (TRUE)
0 (FALSE)
1 (TRUE)
0 (FALSE)
1 (TRUE)
0 (FALSE)
0 (FALSE)
0 (FALSE)
0 (FALSE)
If this were possible, movement would only occur if Input 1 is 1 and Input 2 is 0. Unfortunately such Boolean functionality does not exist. But what if we 'invert' the Blocker Collision values? The table would then look like this:
Area Box Collision
Blocker Collision
Movement
1 (TRUE)
0 (FALSE)
0 (FALSE)
1 (TRUE)
1 (TRUE)
1 (TRUE)
0 (FALSE)
0 (FALSE)
0 (FALSE)
0 (FALSE)
1 (TRUE)
0 (FALSE)
As you can see, this function would only work if both collision values are true (i.e. 1). Such a function exists - It's the Boolean AND function.
But how can we make Blocker Collision's values change? There are two ways actually, but for now, we will be using another Boolean function, XOR. XOR means "Exclusive OR". To understand XOR, you need to understand OR. The OR function results a true if at least one of the inputs are true. The XOR results true if ONLY ONE of the inputs are true - If both are true then it will result false. Such a big meanie!
OR Table:
Area Box Collision
Blocker Collision
Movement
1 (TRUE)
1 (TRUE)
1 (TRUE)
1 (TRUE)
0 (FALSE)
1 (TRUE)
0 (FALSE)
1 (TRUE)
1 (TRUE)
0 (FALSE)
0 (FALSE)
0 (FALSE)
XOR Table:
Area Box Collision
Blocker Collision
Movement
1 (TRUE)
1 (TRUE)
0 (FALSE)
1 (TRUE)
0 (FALSE)
1 (TRUE)
0 (FALSE)
1 (TRUE)
1 (TRUE)
0 (FALSE)
0 (FALSE)
0 (FALSE)
If we add a Boolean XOR between the Blocker Collision and a "1" value, we will effectively invert the value. i.e. 1 (TRUE) will become 0 (FALSE) and vice versa. The Final Result would be:
Blocker Result
Area Box
Result
1 (TRUE)
1 (TRUE)
1 (TRUE)
0 (FALSE)
1 (TRUE)
0 (FALSE)
1 (TRUE)
0 (FALSE)
0 (FALSE)
0 (FALSE)
0 (FALSE)
0 (FALSE)
Since the last node On value is only enabled by a True condition, the only truecondition of this situation would be with the Blocker Collision off and the Area Box Collision on, which is what we need! If the Area Collision ceases, the movement will stop, and if the Blocker collision happens, the movement will also stop.
Still keeping up? Finding this a little confusing? If case your brain is getting hot, try some C.O.F.F.E.E.! Yeah that was a nasty, evil joke. Sorry. ;)
Now back to the tutorial. Right click the window and select New Node > XPresso > Bool > Bool. Create two Booleans, as one will be the XOR and the other will be AND. Connect the XOR first input with the Blocker Collision node output. Now connect the AND first node with the Area Box Collision, and the second with the XOR boolean output. Connect it's output with the last Right Door Node On Input. Now, you will need to create a value to XOR with the Blocker Collision. Right click and select New Node > XPresso > Calculate > Absolute. Leave it's input alone and connect the Output with the XOR Boolean's second input.
Now on the attribute window. Click on the Absolute node and set it's value to 1, as it will input to the XOR as a true value. Click the XOR Boolean(fearlessanimators.blogspot.com) and, in the Node tab, choose XOR as a function (naturally). Do the same for the AND Boolean, but selecting the AND Value (obviously). All your hard work and patience with this section should have left you with an XPresso screen like this:
We're done here (finally).
Section 5 - Turning On The Switch When The Door Stops Moving
Well, do you remember what I said about the Lightspot being a Switch? Yep, we're going to need a Switcher to make the door go back to its original position. The idea is that when the door collides with the Blocker, a switch is set. If this switch is on and there is no object in area box, then the door will return. When both doors collide, the switch turns off. Thus, if the switch is off and there is no object in the area box, the door will stop. If the switch is on and there is an object in the area box the doors will be stopped (they might be just colliding with the blocker in this case). If switch is off and the object is in the area box, then the door will move in the direction of the blocker until it collides with it. This part is easy. If the Blocker collision is true, then the Switch will be turned on.
With that overly verbose explanation over, let's begin with the fun:
Firstly, drag-and-drop the Switch to XPresso. Add an On node and a Brightness node to it. The On node's function is obvious - It will be activated if the Collision is true. The Brightness is the value we'll use as the On/Off. Now, keep in mind that the Brightness works as a percentage - and we're working with real values. Thus 100% = 1 and 0% = 0. Perfect for a true/false statement. There are many "Brightness" inputs in the Lightspot object, but we are using the one in the General tab, so always use the General > Brightness input. Make sure this is correct, as it will not work if you use the wrong one!
Now onto the juicy stuff! Firstly, connect the On value with the Blocker Collision. This way if they collide the node will be enabled. Then, connect(fearlessanimators.blogspot.com) the Brightness with the Absolute value we have created previously for the XOR Boolean node. Since you connect an output to various inputs, there will be no problem. Just connect it's output with the Lightspot Brightness input. You should end up with something like this:
Nothing else to see here! Moving on....
Section 6 - Breaktime
By now you can appreciate how awesomely tiresome it can be to learn a programming pseudo-class and remain a dedicated artist. I have, therefore, decided to include this chapter, which has the sole purpose of getting you to relax or take a break (if you haven't had one already). It may be a bit ridiculous, but I've been studying psychology and this is a technique that sounded interesting to me. It gives your brain a bit of relaxation, and can restore clearer thinking. So, have your break time and let's move on!
Section 7 - Making The Door Return
Just to add to the confusion a little, we are now going to create a different series of nodes. Remember the Switch? Well, we will make a script that responds to the "True" condition by moving the right door to the left.
So, without further ado, add the Lightspot node, and insert a Brightness output. Now, add two Right Door nodes and a Math node. We're going to do the opposite of what we've done before. Create a Position.X Output in the first node and a Position.X with an On Input on the last node. Connect this On node with the Switch Brightness. Set the Math function to subtract and enter the same value in Input 2 that you used in the first Math function. Connect Input 1 to the Position.X Output of the first Right Door node, and the Output to the Position.X Input of the second door node. You should end up with a separate little node trail looking like this:
The door must stop when both the right and left doors collide. We can do this by disabling the Brightness Switch. To do this, simply insert both Right and Left Door and connect them with a Collision node. Connect the output of this Collision node with an On input in a new Switch node, and connect an absolute node with value 0 with the brightness input of the Switch. This way, when they collide, the brightness will be reduced to 0, and thus the doors will stop. Your full, unadulterated screen in XPresso should now look like this:
Now, copy and paste all these nodes, and invert all the Right Door values to Left Door values, Right Blocks to Left Blocks, the Maths subtract to add functions, and(fearlessanimators.blogspot.com) vice-versa, thus cloning the code onto the left door.
And that is it - You're done! Congratulations! By learning these basics of XPresso you will make future projects much easier to manage. If you feel suitably enthusiastic, you should now go try new methods of getting the same door movement. There are tons(fearlessanimators.blogspot.com) of different routes. Almost anything you can imagine is possible here. Oh, and remember, if you have any feedback or further questions, you can send me an e-mail over at fearlessanimators@gmail.com.(FLAC)
(FLAC)YOU IMAGINE WE CREATE.
Facebook has unveiled a new location based service called Facebook Places to help you easily broadcast your current location to your friends on Facebook.
For instance, if you are inside a shopping mall, you can tell your friends where you are through Facebook Places and the service will also show you other people who may be near that place around the same time. Watch the following video to learn more:
What is Facebook Places
Who’s gets to see your location on Facebook
Privacy will obviously be a concern and, fortunately, this time Facebook has added extremely simple settings to let you control the visibility of places where you are checking-in.
You may go to Facebook Privacy –> Customize Settings and change the option under “Places I check in” to friends, friends of friends or set it to everyone in case you would like broadcast your current geographic location to the whole world. Hide Location from all
If you would like to hide your geo-location from everyone, either don’t check-in with Facebook Places at all or simple go back to “Places I check in” and set it to Custom –> Only Me. Show Location to Selected Contacts
Finally, if you are connected with a large number of people on Facebook and would like to share your location only with close friends and family members, you can do that as well.
Go to your Facebook Friends page and create one or more lists of people with whom you want to share your current location. Then go back to your Facebook privacy page, choose Custom –> Make this visible to and type the names of your new friends list.
You may use Facebook Places using the mobile browser of any cell phone that supports HTML5 and geolocation. The service however is currently available only in the U.S. and everyone else may have to wait a bit.
This is a short video animation captured using the free version of Google Earth.
The video in high-resolution (720p HD) and the animation plays very smoothly but before I share the actual software that I used to record this movie clip, please read the guidelines for using content from Google Earth and Google Maps:
[Offline use] If your proposed offline use of Google Maps or Google Earth is limited in scope, the concept of ‘fair use’ may apply
[Online use] You do not need permission to create and display video created from Google Maps or Google Earth in a video, whether hosted on your own site or through a service such as YouTube. You must purchase a copy of Google Earth Pro if exporting motion video, because screen capturing is not allowed.
If your usage meets the ‘fair use’ criteria, you can use the free Wegame client to record movies of Google Earth on your Windows machine. Wegame, a popular tool for recording video games, was recently updated and it now supports full-screen recording at 30 frames-per-second for smooth video.
Unlike most other screencasting software where you just hit the Record hotkey to start recording, it may take a couple of tries for you to get comfortable with the Wegame capture process.
Launch the Wegame client and connect with your online account – you don’t have to upload your movies online but you still need to login for the software to work.
Then launch Google Earth and you’ll see a green square box inside the Earth program. Hit F6 and the square should disappear meaning the animations are getting recorded. Hit F6 to stop the capture and the recorded video will get saved in your My Documents folder.
If you are recording Google Earth animations on a slow machine, try lowering the frame rate to 15 or 20 and also switch to Half-screen recording. The video is saved in Windows Media format that you can play in almost every media player.
<a href="http://www.youtube.com/watch?v=nnjdocFfi7M">Watch the Stop Motion Animation Video on Youtube (19 seconds)</a>
Sometime back, I created a stop-motion animation film with the soft toys of my 2-year old son playing the lead roles. This 19 second movie was done using just a digital still camera (not video camcorder) and Windows Movie Maker, a free video editing software.
If the term "Stop Motion" is new for you, Wikipedia defines it as an animation technique which makes static objects appear to move. The object is moved by very small amounts between individual frames, producing the effect of motion when the film is played back.
To create a stop motion animation, you need a webcam or a basic digital camera (preferably mounted on a tripod for stability) and any video editing software (like Windows Movie Maker, Adobe Premiere Pro, Apple iMovie, etc)
Step 1: Fix your camera in front of the subjects (Mickey Mouse & Co. in my case). You can also your webcam mounted on the computer screen and capture still photographs using the keyboard.
Step 2: Visualize the movements and action of the characters in the movie (like what path they would follow, whether they would jump, etc). You may want to write this down as a rough movie script.
Step 3: Once your initial setting is in place, click the first picture. Now move the object(s) by a very small distance (few centimeters) and shoot the next picture. Make sure you don't change the position of your camera.
Repeat the step until all your characters reach the final frame.
Here's are some sample photographs shot for the movie embedded above - Notice how the elephant, dog and Mickey have moved in each of the frames while the bear is sitting still.
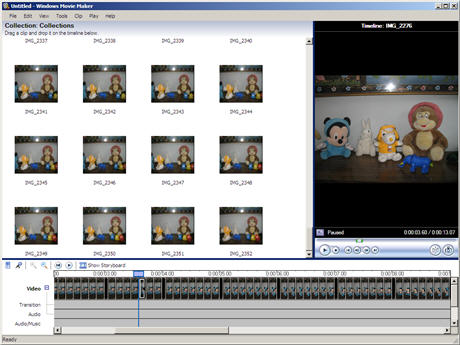
Step 4: Open Windows Movie Maker and goto Tools, Options and click the Advanced tab. Change the "Picture Duration" to 0.125 seconds and Transition Duration to 0.25 seconds (both are minimum values).
Now import all your digital photographs into Movie Maker and drag-n-drop them onto the Video Timeline. That's it. Export the video in AVI or WMV format and upload it to YouTube for sharing with your friends.
Bonus Tip: If you like your characters to jump in the stop-motion animation video, attach them to a thin wire and lift the wire a few centimeters in each frame. If the wire is of the same color as the background, it won't be visible in the final movie.
If you have professional video editing software like Adobe Premiere Pro or Apple Final Cut Pro, you can further reduce the time duration between still photographs to create smooth animation video without flickers or jerks.